
MICROBIOLOGY
A L A B O R A T O R Y M A N U A L
TENTH EDITION
James G. Cappuccino
SUNY Rockland Community College
Natalie Sherman
SUNY Rockland Community College
Boston Columbus Indianapolis New York San Francisco Upper Saddle River
Amsterdam Cape Town Dubai London Madrid Milan Munich Paris Montréal Toronto
Delhi Mexico City São Paulo Sydney Hong Kong Seoul Singapore Taipei Tokyo
Director of Development: Barbara Yien
Senior Project Development Editor: Marie Beaugureau
Editorial Assistant: Ashley Williams
Managing Editor: Deborah Cogan
Production Project Manager: Megan Power
Production Management and Composition: Integra
Interior Designer: Jerilyn Bockorick
Cover Designer: Yvo Riezebos
Image Management: Travis Amos
Manufacturing Buyer: Stacey Weinberger
Executive Marketing Manager: Neena Bali
Text Printer: Webcrafters, Inc.
Cover Printer: Lehigh-Phoenix Color
Cover Photo Credit: Andreas Reh / Getty Images
Credits and acknowledgments borrowed from other sources and reproduced, with permission, in
this textbook appear on the appropriate page within the text or on p. 531.
Copyright © 2014, 2011, 2008 Pearson Education, Inc. All rights reserved. Manufactured in the
United States of America. This publication is protected by Copyright, and permission should be
obtained from the publisher prior to any prohibited reproduction, storage in a retrieval system,
or transmission in any form or by any means, electronic, mechanical, photocopying, recording,
or likewise. To obtain permission(s) to use material from this work, please submit a written
request to Pearson Education, Inc., Permissions Department, 1900 E. Lake Ave., Glenview, IL
60025. For information regarding permissions, call (847) 486-2635.
Many of the designations used by manufacturers and sellers to distinguish their products are
claimed as trademarks. Where those designations appear in this book, and the publisher was
aware of a trademark claim, the designations have been printed in initial caps or all caps
Library of Congress
Cappuccino, James G.
Microbiology : a laboratory manual/James G. Cappuccino, Natalie Sherman.—10th ed.
p.; cm.
Includes bibliographical references and index.
ISBN-13: 978-0-321-84022-6
ISBN-10: 0-321-84022-4
I. Sherman, Natalie. II. Title.
[DNLM: 1. Microbiology—Laboratory Manuals. QW 25]
LC Classification not assigned
579.078—dc23
2012037762
Student edition
ISBN 10: 0-321-84022-4
ISBN 13: 978-0-321-84022-6
Instructor’s Review Copy
ISBN 10: 0-321-88451-5
ISBN 13: 978-0-321-88451-0
Preface ix
Laboratory Safety xiii
Laboratory Protocol xv
Basic Laboratory Techniques for Isolation, Cultivation, and Cultural Characterization of Microorganisms
LEARNING OBJECTIVES
Once you have completed the experiments in this section, you should be familiar with
1. The types of laboratory equipment and culture media needed to develop and maintain pure cultures.
2. The types of microbial flora that live on the skin and the effect of hand washing on them.
3. The concept of aseptic technique and the procedures necessary for successful subculturing of microorganisms.
4. Streak-plate and spread-plate inoculation of microorganisms in a mixed microbial population for subsequent pure culture isolation.
5. Cultural and morphological characteristics of microorganisms grown in pure culture.
Introduction
Microorganisms are ubiquitous. They are found
in soil, air, water, food, sewage, and on body surfaces.
In short, every area of our environment is
replete with them. The microbiologist separates
these mixed populations into individual species
for study. A culture containing a single unadulterated
species of cells is called a pure culture. To
isolate and study microorganisms in pure culture,
the microbiologist requires basic laboratory apparatus
and the application of specific techniques, as
illustrated in Figure P1.1.
Media
The survival and continued growth of microorganisms depend on an adequate supply of nutrients and a favorable growth environment. For survival, most microbes must use soluble low-molecular-weight substances that are frequently derived from the enzymatic degradation of complex nutrients. A solution containing these nutrients is a culture medium. Basically, all culture media are liquid, semisolid, or solid. A liquid medium lacks a solidifying agent and is called a broth medium. A broth medium supplemented with a solidifying agent called agar results in a solid or semisolid medium. Agar, an extract of seaweed, is a complex carbohydrate composed mainly of galactose, and is without nutritional value. Agar serves as an excellent solidifying agent because it liquefies at 100°C and solidifies at 40°C.
Because of these properties, organisms, especially pathogens, can be cultivated at temperatures of 37.5°C or slightly higher without fear of the medium liquefying. A completely solid medium requires an agar concentration of about 1.5 to 1.8%. A concentration of less than 1% agar results in a semisolid medium. A solid medium has the advantage that it presents a hardened surface on which microorganisms can be grown using specialized techniques for the isolation of discrete colonies. Each colony is a cluster of cells that originates from the multiplication of a single cell and represents the growth of a single species of microorganism.
Such a defined and well-isolated colony is a pure culture. Also, while in the liquefied state, solid media can be placed in test tubes, which are then allowed to cool and harden in a slanted position, producing agar slants. These are useful for maintaining pure cultures. Similar tubes that, following preparation, are allowed to harden in the upright position are designated as agar deep tubes. Agar deep tubes are used primarily for the study of the gaseous requirements of microorganisms.
However, they may be liquefied in a boiling water bath and poured into Petri dishes, producing agar plates, which provide large surface areas for the isolation and study of microorganisms. The various forms of solid media are illustrated in Figure P1.2.
In addition to nutritional needs, the environmental factors must also be regulated, including proper pH, temperature, gaseous requirements, and osmotic pressure. A more detailed explanation is presented in Part 4, which deals with cultivation of microorganisms; for now, you should simply bear in mind that numerous types of media are available.
 |
| Figure P1.1 Laboratory apparatus and culture techniques |
Equipment > Media : Broth, Semisolid, Solid
Solid > Agar slant, Agar deep, Agar plate.
Equipment > Autoclave, Bunsen burner, Culture tubes
Equipment > Petri dishes, Wire loops and needles, Pipettes < Transfer instruments.
Equipment > Waterbaths, Incubators < Cultivation chambers
Equipment > Refrigerators
Pure culture techniques > Streak plate, Pour plate–loop dilution, Spread plate < Isolation of pure cultures
 |
| Figure P1.2 Forms of solid (agar) media
(a) Agar slants
(b) Agar deep tube
(c) Agar plate
|
 |
| Figure P1.3 Sterilization techniques |
Heat
1. Dry (hot air)
160° to 180°C for 1 to 3 hours; for empty glassware, glass pipettes, and glass syringes
2. Moist (wet heat)
Free-flowing steam at 100°C (intermittent sterilization); for thermolabile solutions (e.g., sugars, milk)
Autoclave, steam under pressure, temperatures above 100°C; for culture media, syringes, thermostable solutions, etc.
Filtration
Cellulose-acetate membrane filters with pore sizes in the range of 8.0 μm to less than 0.05 μm (Removal of organisms from thermolabile solutions by passage through filters that retain bacteria; note, viruses are not removed by this procedure).
Chemicals
Ethylene oxide > Plastic dishes and pipettes
Beta-propiolactone > Living tissues
Radiation
Ionizing > Plastic pipettes and Petri dishes
Aseptic Technique
Sterility is the hallmark of successful work in the microbiology laboratory, and sterilization is the process of rendering a medium or material free of all forms of life. To achieve sterility, it is mandatory that you use sterile equipment and employ aseptic techniques when handling bacterial cultures. Although a more detailed discussion is presented in Part 9, which describes the control of microorganisms, Figure P1.3 is a brief outline of the routine techniques used in the microbiology laboratory.
Culture Tubes and Petri Dishes
Glass test tubes and glass or plastic Petri dishes are used to cultivate microorganisms. A suitable nutrient medium in the form of broth or agar may be added to the tubes, while only a solid medium is used in Petri dishes. A sterile environment is maintained in culture tubes by various types of closures. Historically, the first type, a cotton plug, was developed by Schröeder and von Dusch in the nineteenth century. Today most laboratories use sleevelike caps (Morton closures) made of metal, such as stainless steel, or heat-resistant plastics. The advantage of these closures over the cotton plug is that they are labor-saving and, most of all, slip on and off the test tubes easily.
Petri dishes provide a larger surface area for growth and cultivation. They consist of a bottom dish portion that contains the medium and a larger top portion that serves as a loose cover.
Petri dishes are manufactured in various sizes to meet different experimental requirements. For routine purposes, dishes approximately 15 cm in diameter are used. The sterile agar medium is dispensed to previously sterilized dishes from molten agar deep tubes containing 15 to 20 ml of medium, or from a molten sterile medium prepared in bulk and contained in 250-, 500-, and 1000-ml flasks, depending on the volume of medium required. When cooled to 40°C, the medium will solidify. Remember that after inoculation, Petri dishes are incubated in an inverted position (top down) to prevent condensation formed on the cover during solidification from dropping down onto the surface of the hardened agar. Figure P1.4 illustrates some of the culture vessels used in the laboratory. Built-in ridges on tube closures and Petri dishes provide small gaps necessary for the exchange of air.
Transfer Instruments
Microorganisms must be transferred from one vessel to another or from stock cultures to various media for maintenance and study. Such a transfer is called subculturing and must be carried out under aseptic conditions to prevent possible contamination.
Wire loops and needles are made from inert metals such as Nichrome or platinum and are inserted into metal shafts that serve as handles. They are extremely durable instruments and are easily sterilized by incineration in the blue (hottest) portion of the Bunsen burner flame.
 |
| Figure P1.4 Culture vessels |
A pipette is another instrument used for aseptic transfers. Pipettes are similar in function to straws; that is, they draw up liquids. They are made of glass or plastic drawn out to a tip at one end and with a mouthpiece forming the other end. They are calibrated to deliver different volumes depending on requirements. Pipettes may be sterilized in bulk inside canisters, or they may be wrapped individually in brown paper and sterilized in an autoclave or dry-heat oven.
Figure P1.5 illustrates these transfer instruments. The proper procedure for the use of pipettes will be demonstrated by your instructor.
!!! Pipetting by mouth is not permissible!
Pipetting is to be performed with the aid of mechanical pipette aspirators.
Cultivation Chambers
The specific temperature requirements for growth are discussed in detail in Part 4. However, a prime requirement for the cultivation of microorganisms is that they be grown at their optimum temperature. An incubator is used to maintain optimum temperature during the necessary growth period. It resembles an oven and is thermostatically controlled so that temperature can be varied depending on the requirements of specific microorganisms. Most incubators use dry heat.
Moisture is supplied by placing a beaker of water in the incubator during the growth period. A moist environment retards dehydration of the medium and thereby avoids misleading experimental results. A thermostatically controlled shaking waterbath is another piece of apparatus used to cultivate microorganisms. Its advantage is that it provides a rapid and uniform transfer of heat to the culture vessel, and its agitation provides increased aeration, resulting in acceleration of growth. The single disadvantage of this instrument is that it can be used only for cultivation of organisms in a broth medium.
 |
| Figure P1.5 Transfer instruments |
Refrigerator
A refrigerator is used for a wide variety of purposes such as maintenance and storage of stock cultures between subculturing periods, and storage of sterile media to prevent dehydration. It is also used as a repository for thermolabile solutions, antibiotics, serums, and biochemical reagents.
Effectiveness of Hand WashingA refrigerator is used for a wide variety of purposes such as maintenance and storage of stock cultures between subculturing periods, and storage of sterile media to prevent dehydration. It is also used as a repository for thermolabile solutions, antibiotics, serums, and biochemical reagents.
LEARNING OBJECTIVES
Once you have completed this experiment, you should understand
1. The difference between the residential flora and transient flora found on skin surfaces.
2. The effect of hand washing on the reduction of organisms on the skin.
3. The effectiveness of using soap alone or soap accompanied by surgical brushing.
Each day our hands come in contact with numerous objects and surfaces that are contaminated with microorganisms. These may include door handles, light switches, shopping carts, sinks, toilet seats, books, or even things like compost piles or body fluids, to name a few. The lack of adequate hand washing is a major vehicle in the transmission of microbial infection and disease.
The skin of a human being is sterile while in utero and first becomes colonized by a normal microbial flora at birth as it is passed through the birth canal. By the time you reach adulthood, your skin is calculated to contain 1012 (1,000,000,000,000), or one trillion, bacteria, most of which are found in the superficial layers of the epidermis and upper hair follicles. This normal flora of microorganisms is called the resident flora, the presence of which does not cause negative effects in healthy individuals. In fact, it forms a symbiotic relationship with your skin, which is vital to your health. This beneficial relationship can change in patients who are immunocompromised, or when residential flora accidently gains entrance to the host via inoculating needles, indwelling catheters, lacerations, and the like. Microorganisms that are less permanent and present for only short periods are termed transient flora. This latter flora can be removed with good hand washing techniques. The resident flora is more difficult to remove because they are found in the hair follicles and covered by hair, oil, and dead skin cells that obstruct their removal by simple hand washing with soap. Surgical scrubbing is the best means for removal of these organisms from the skin.
Surgical hand washing was introduced into medical practice in the mid-nineteenth century by the Hungarian physician Ignatz Semmelweis while working at an obstetric hospital in Vienna. He observed that the incidence of puerperal fever (child birth fever) was very high, with a death rate of about 20%. He further observed that medical students examining patients and assisting in deliveries came directly from cadaver (autopsy) laboratories without stopping to wash their hands. Upon his insistence, medical students and all medical personnel were required to wash their hands in a chloride of lime (bleach) solution before and after all patient contact. The incidence of death from puerperal fever dropped drastically to around 1%. Semmelweis’s effort was responsible for the development of routine surgical scrubbing by surgeons, which has become essential practice for all surgical procedures in modern medicine.
CLINICAL APPLICATION
Preventing Nosocomial Infections
Nosocomial (hospital-acquired) infections are mainly transmitted from the unwashed hands of health care providers. Transient and residential flora on health care providers’ skin can infect hospital patients whose immune systems are compromised.
The cornerstone for the prevention of nosocomial infections is the meticulous hand washing and scrubbing of health care personnel. In the laboratory setting, your normal flora may contaminate patient samples and skew your result, leading to a misdiagnosis. It is important for everyone in the lab to correctly wash their hands before and after handling biological materials.
Materials
Media
4 nutrient agar plates per student pair
Equipment
Liquid antibacterial soap, 8 sterile cotton swabs, 2 test tubes of sterile saline, Bunsen burner, glass
marking pencil, surgical hand brush, Quebec colony counter, stopwatch.
Procedure Lab One
1. One student will become the washer and the other student the assistant. The washer must not wash hands before coming to the lab.
2. The assistant will use the glass marking pencil to label the bottoms of the nutrient agar plates.
The assistant will mark two plates as “Water” and two plates as “Soap” and draw a line down the middle of each plate to divide each plate in half. For the “Water” plates, label the halves as R1, R2, R3, and R4. For the “Soap” plates, label the halves as L1, L2, L3, and L4. See Figure 1.1.
3. The assistant will aseptically dip a sterile cotton swab into the first test tube of sterile saline.
To do this:
a. First light the Bunsen burner.
b. Uncap the test tube; after removing the cap, keep the cap in your hand with the inner aspect of the cap pointed away from your palm. The cap must never be placed on the laboratory bench because doing so would compromise the aseptic procedure.
c. Flame the neck of the tube by briefly passing it through the flame of the Bunsen burner.
d. Remove the tube from the flame and dip the swab in the tube, soaking it with saline. Avoid touching the sides of the tube with the swab.
The assistant will then rub the moistened cotton swab on the pad of the washer’s right thumb.
4. The assistant will then aseptically inoculate the half of the nutrient agar plate labeled R1 by streaking the far edge of the plate several times then making a zig zag streak only on the half labeled R1. See Figure 1.2.
Caution: Do not gouge the surface of the agar plate.
5. The assistant will turn on the tap on the lab sink, so that the washer can wash the right hand under warm running water, without soap, concentrating on the thumb (rubbing the thumb over the right index and middle finger) for one minute. The assistant will turn off the tap. The washer will shake off the excess water from the hand, but not blot dry. The assistant, using a new, dry (not moistened with saline) sterile cotton swab, will obtain a sample from the right thumb pad and inoculate the section of the nutrient agar plate labeled R2 in the same way that R1 was inoculated.
6. Repeat step 5 two more times, washing the thumb for 2 minutes and then 3 minutes, respectively.
The assistant will use a new, dry sterile cotton swab each time, and will aseptically inoculate R3 and R4, respectively. See Table 1.1.
7. The assistant and washer will now move to the left hand. The assistant will aseptically dip the sterile cotton swab into the second test tube of sterile saline (following the process from Step 3) and will rub the moistened cotton swab over the pad of the left thumb and aseptically inoculate L1 as shown in Figure 1.2.
 |
| Figure 1.1 Plate labeling |
 |
| Figure 1.2 Plate inoculation |
| TABLE1.1 | Inoculation of Nutrient Agar Plates | ||
| WATER—RIGHT THUMB | SOAP—LEFT THUMB | ||
| R1 | No wash, damp cotton swab | L1 | No wash, damp cotton swab |
| R2 | Wash 1 minute, dry cotton swab | L2 | Wash with soap 1 minute, dry cotton swab |
| R3 | Wash 2 minutes, dry cotton swab | L3 | Soap and surgical brush 2 minutes, dry cotton swab |
| R4 | Wash 3 minutes, dry cotton swab | L4 | Soap and surgical brush 3 minutes, dry cotton swab |
8. The assistant will turn on the tap of the lab’s sink so that the washer can wet the thumb and index finger of the left hand under warm running water. The assistant will apply one or two drops of liquid soap to the thumb and index finger and the washer will wash for 1 minute by rubbing the thumb over the index finger. Rinse well. Shake off water from the hand but do not blot dry. The assistant will turn off the tap. The assistant will then use a dry, sterile cotton swab to obtain a sample from the washed thumb pad and inoculate L2.
9. Repeat step 8 two more times, not only using soap but also scrubbing the thumb with a surgical brush, for 2 minutes and then 3 minutes, respectively. The washer will obtain the surgical brush and the assistant will add saline to the brush to dampen it, and then add one or two drops of soap to the thumb and also the brush. Caution: Place the brush bristles up on a dry paper towel between washings. The assistant will use a new, dry sterile cotton swab each time, and will aseptically inoculate L3 and L4, respectively. Refer back to Table 1.1.
10. Incubate all plates in an inverted position at 37°C for 24 to 48 hours.
Procedure Lab Two
Examine and record the amount of growth found on each nutrient agar plate. Results may be determined by two methods.
1. Macroscopically. Visually observe the presence of growth on the surface of each agar plate in each section.
Record your results in your Lab Report as 0 = no growth, 1+ = slight growth, 2+ = moderate growth, 3+ = heavy growth, and 4+ = maximum growth.
2. Percent Growth Reduction.
a. Count the colonies that appear in each section of the agar plates using a Quebec colony counter. If more than 300 colonies are present, label it as “too numerous to count (TNTC),” if fewer than 30 colonies are present, label it as “too few to count (TFTC).”
b. For sections R2, R3, R4 and L2, L3, L4, calculate the percent growth reduction from the first section, using the following equation:
Percent reduction = [Colonies(section 1) - Colonies(section x)] , Colonies(section 1)
X = sections 2, 3, 4 for each hand

Culture Transfer Techniques
LEARNING OBJECTIVES
Once you have completed this experiment, you should be able to
1. Carry out the technique for aseptic removal and transfer of microorganisms for subculturing.
2. Correctly sterilize inoculating instruments in the flame of a Bunsen burner.
3. Correctly manipulate your fingers to remove and replace the test tube closure.
Principle
Microorganisms are transferred from one medium to another by subculturing. This technique is of basic importance and is used routinely in preparing and maintaining stock cultures, as well as in microbiological test procedures.
Microorganisms are always present in the air and on laboratory surfaces, benches, and equipment.
They can serve as a source of external contamination and thus interfere with experimental results unless proper aseptic techniques are used during subculturing.
Described below are essential steps that you must follow for aseptic transfer of microorganisms.
The complete procedure is illustrated in Figure 2.1.
1. Label the tube to be inoculated with the name of the organism and your initials.
2. Hold the stock culture tube and the tube to be inoculated in the palm of your hand, secure with your thumb, and separate the two tubes to form a V in your hand.
3. Sterilize an inoculating needle or loop by holding it in the hottest portion of the Bunsen burner flame, until the wire becomes red hot.
Then, rapidly pass the upper portion of the handle through the flame. Once flamed, the loop is never put down but is held in the hand and allowed to cool for 10 to 20 seconds.
4. Uncap the tubes by grasping the first cap with your little finger and the second cap with your next finger and lifting the closure upward.
Note: Once removed, these caps must be kept in the hand that holds the sterile inoculating loop or needle; thus, the inner aspects of the caps point away from the palm of the hand.
They must never be placed on the laboratory bench because doing so would compromise the aseptic procedure.
5. After removing the closures, flame the necks and mouths of the tubes by briefly passing them through the flame two–three times rapidly.
The sterile transfer instrument is further cooled by touching it to the sterile inside wall of the culture tube before removing a small sample of the inoculum.
6. Depending on the culture medium, a loop or needle is used for removal of the inoculum. Loops are commonly used to obtain a sample from a broth culture. Either instrument can be used to obtain the inoculum from an agar slant culture by carefully touching the surface of the solid medium in an area exhibiting growth so as not to gouge the agar. A straight needle is always used when transferring microorganisms to an agar deep tube from both solid and liquid cultures.
a. For a slant-to-broth transfer, obtain inoculum from the slant and lightly shake the loop or needle in the broth culture to dislodge the microorganisms.
b. For a broth-to-slant transfer, obtain a loopful of broth and place at the base of an agar slant medium. Lightly draw the loop over the hardened surface in a straight or zigzag line, from the base of the agar slant to the top.
c. For a slant-to-agar deep transfer, obtain the inoculum from the agar slant. Insert a straight needle to the bottom of the tube in a straight line and rapidly withdraw along the line of insertion. This is called a stab inoculation.
7. Following inoculation, remove the instrument and reflame the necks of the tubes.
8. Replace the caps on the same tubes from which they were removed.
9. Reflame the loop or needle to destroy any remaining organisms.
In this experiment you will master the manipulations required for aseptic transfer of microorganisms in broth-to-slant, slant-to-broth, and slant-to-agar deep transfers. The technique for transfer to and from agar plates is discussed in Experiment 3.
CLINICAL APPLICATION
Aseptic Inoculation and Transfer
It’s mandatory for those working in a microbiology laboratory to learn and perfect the skill of inoculating bacterial specimens on agar plates, in liquid broth, or in semisolid medium, and subsequently be able to subculture the organism from one medium to another. A sterile inoculating needle or loop is the basic instrument of transfer. It is important that you keep in mind that transferring bacterial cultures requires aseptic or sterile techniques at all times, especially if you are working with pathogens. In short, do not contaminate what you are working with and do not contaminate yourself
 |
| Figure 2.1 Subculturing procedure |
AT THE BENCH
Materials
Cultures
24-hour nutrient broth and nutrient agar slant cultures of Serratia marcescens.
Media
Per designated student group: one nutrient broth, one nutrient agar slant, and one nutrient agar deep tube.
Equipment
Bunsen burner, inoculating loop and needle, and glassware marking pencil.
Procedure Lab One
1. Label all tubes of sterile media as described in the Laboratory Protocol section on page xv.
2. Following the procedure outlined and illustrated previously (Figure 2.1), perform the following transfers:
a. S. marcescens broth culture to a nutrient agar slant, nutrient agar deep tube, and nutrient broth.
b. S. marcescens agar slant culture to a nutrient broth, nutrient agar slant, and nutrient agar deep tube.
3. Incubate all cultures at 25°C for 24 to 48 hours.
Procedure Lab Two
1. Examine all cultures for the appearance of growth, which is indicated by turbidity in the broth culture and the appearance of an orange-red growth on the surface of the slant and along the line of inoculation in the agar deep tube.
2. Record your observations in the chart provided in the Lab Report.

Techniques for Isolation of Pure Cultures
In nature, microbial populations do not segregate themselves by species but exist with a mixture of many other cell types. In the laboratory, these populations can be separated into pure cultures. These cultures contain only one type of organism and are suitable for the study of their cultural, morphological, and biochemical properties.
In this experiment, you will first use one of the techniques designed to produce discrete colonies. Colonies are individual, macroscopically visible masses of microbial growth on a solid medium surface, each representing the multiplication of a single organism. Once you have obtained these discrete colonies, you will make an aseptic transfer onto nutrient agar slants for the isolation of pure cultures.
PART A
Isolation of Discrete Colonies from a Mixed Culture
LEARNING OBJECTIVE
Once you have completed this experiment, you should be able to
1. Perform the streak-plate and/or the spreadplate inoculation procedure to separate the cells of a mixed culture so that discrete colonies can be isolated.
Principle
The techniques commonly used for isolation of discrete colonies initially require that the number of organisms in the inoculum be reduced. The resulting diminution of the population size ensures that, following inoculation, individual cells will be sufficiently far apart on the surface of the agar medium to separate the different species. The following are techniques that can be used to accomplish this necessary dilution:
1. The streak-plate method is a rapid qualitative isolation method. It is essentially a dilution technique that involves spreading a loopful of culture over the surface of an agar plate. Although many types of procedures are performed, the four-way, or quadrant, streak is described. Refer to Figure 3.1, which schematically illustrates this technique.
a. Place a loopful of culture on the agar surface in Area 1. Flame the loop, cool it by touching an unused part of the agar surface close to the periphery of the plate, and then drag it rapidly several times across the surface of Area 1.
b. Reflame and cool the loop, and turn the Petri dish 90°. Then touch the loop to a corner of the culture in Area 1 and drag it several times across the agar in Area 2. The loop should never enter Area 1 again.
c. Reflame and cool the loop and again turn the dish 90°. Streak Area 3 in the same manner as Area 2.
d. Without reflaming the loop, again turn the dish 90° and then drag the culture from a corner of Area 3 across Area 4, using a wider streak. Don’t let the loop touch any of the previously streaked areas. The flaming of the loop at the points indicated is to dilute the culture so that fewer organisms are streaked in each area, resulting in the final desired separation. A photograph of a streak-plate inoculation is shown in Figure 3.2.
 |
| Figure 3.1 Four-way streak-plate technique |
 | ||
| Figure 3.2 Four-way streak-plate inoculation with | Serratia marcescens |
 |
| Figure 3.3 Petri dish turntable |
2. The spread-plate technique requires that a previously diluted mixture of microorganisms be used. During inoculation, the cells are spread over the surface of a solid agar medium with a sterile, L-shaped bent glass rod while the Petri dish is spun on a “lazy Susan” turntable (Figure 3.3). The step-by-step procedure for this technique is as follows:
a. Place the bent glass rod into a beaker and add a sufficient amount of 95% ethyl alcohol to cover the lower, bent portion.
b. Place an appropriately labeled nutrient agar plate on the turntable. With a sterile pipette, place one drop of sterile water on the center of the plate, followed by a sterile loopful of Micrococcus luteus. Mix gently with the loop and replace the cover.
c. Remove the glass rod from the beaker, and pass it through the Bunsen burner flame with the bent portion of the rod pointing downward to prevent the burning alcohol from running down your arm. Allow the alcohol to burn off the rod completely. Cool the rod for 10 to 15 seconds.
d. Remove the Petri dish cover and spin the turntable.
e. While the turntable is spinning, lightly touch the sterile bent rod to the surface of the agar and move it back and forth. This will spread the culture over the agar surface.
f. When the turntable comes to a stop, replace the cover. Immerse the rod in alcohol and reflame.
g. In the absence of a turntable, turn the Petri dish manually and spread the culture with the sterile bent glass rod.
3. The pour-plate technique requires a serial dilution of the mixed culture by means of a loop or pipette. The diluted inoculum is then added to a molten agar medium in a Petri dish, mixed, and allowed to solidify. The serial dilution and pour-plate procedures are outlined in Experiment 20.
CLINICAL APPLICATION
Isolation of Cultures as a Diagnostic Technique
The isolation of pure cultures is the most important diagnostic tool used in a clinical or research laboratory to uncover the cause of an infection or disease. Before any biochemical or molecular techniques may be used to identify or characterize the causative organism, an individual bacterial colony must be isolated for testing. The isolation of Staphylococcus aureus from cultures taken from abscesses or Streptococcus pyogenes from a throat culture are two examples of clinical applications of this technique.
AT THE BENCH
Materials
Cultures
24- to 48-hour nutrient broth cultures of a mixture of one part Serratia marcescens and three parts Micrococcus luteus and a mixture of one part Escherichia coli and ten parts Micrococcus luteus. For the spread-plate procedure, adjust the cultures to an absorbance (A) of 0.1 at 600 nanometers (nm).
Sources of mixed cultures from the environment could include cultures from a table top, bathroom sink, water fountain, or inside of an incubator. Each student should obtain a mixed culture from one of the environmental sources listed above.
Media
Three Trypticase™ soy agar plates per designated student group for each inoculation technique to be performed.
Equipment
Bunsen burner, inoculating loop, turntable, 95% ethyl alcohol, 500-ml beaker, L-shaped bent glass rod, glassware marking pencil, culture tubes containing 1 ml of sterile water, test tube rack, and sterile cotton swabs.
Procedure Lab One
1. Following the procedures previously described, prepare a spread-plate and/or streakplate inoculation of each test culture on an appropriately labeled plate.
2. Prepare an environmental mixed culture.
a. Dampen a sterile cotton swab with sterile water. Wring out the excess water by pressing the wet swab against the walls of the tube.
b. With the moistened cotton swab, obtain your mixed-culture specimen from one of the selected environmental sources listed in the section on cultures.
c. Place the contaminated swab back into the tube of sterile water. Mix gently and let stand for 5 minutes.
d. Perform spread-plate and/or streak-plate inoculation on an appropriately labeled plate.
3. Incubate all plates in an inverted position for 48 to 72 hours at 25°C.
Procedure Lab Two
1. Examine all agar plate cultures to identify the distribution of colonies. In the charts provided in Part A of the Lab Report, complete the following:
a. Draw the distribution of colonies appearing on each of the agar plate cultures.
b. On each of the agar plate cultures, select two discrete colonies that differ in appearance. Using Figure 4.1 on page 30 as a reference, describe each colony as to its
Form: Circular, irregular, or spreading.
Elevation: Flat, slightly raised, or markedly raised.
Pigmentation.
Size: Pinpoint, small, medium, or large.
2. Retain the mixed-culture plates to perform Part B of this experiment.
PART B
Isolation of Pure Cultures from a Spread-Plate or Streak-Plate Preparation
LEARNING OBJECTIVE
Once you have completed this experiment, you should be able to
1. Prepare a stock culture of an organism using isolates from mixed cultures prepared on an agar streak plate and/or spread plate.
Principle
Once discrete, well-separated colonies develop on the surface of a nutrient agar plate culture, each may be picked up with a sterile needle and transferred to separate nutrient agar slants. Each of these new slant cultures represents the growth of a single bacterial species and is designated as a pure or stock culture.
CLINICAL APPLICATION
Transferring a Colony of Bacteria Daughter Cells
For identification of a bacterial pathogen, a discrete bacterial colony must be transferred from a streak or spread plate to the new testing media. This new culture will consist of daughter cells that are genetic and metabolic clones of the original bacterial cells that were transferred to the plate. This will allow for identification of the unknown bacterial species through its biochemical and molecular characteristics.
AT THE BENCH
Materials
Cultures
Mixed-culture, nutrient agar streak-plate and/or spread-plate preparations of S. marcescens and M. luteus, M. luteus and E. coli, and the environmental specimen plate from Part A.
Media
Four Trypticase soy agar slants per designated student group.
Equipment
Bunsen burner, inoculating needle, and glassware marking pencil.
Procedure Lab One
1. Aseptically transfer, from visibly discrete colonies, the yellow M. luteus, the white E. coli, the red S. marcescens, and a discrete colony from the environmental agar plate specimen to the appropriately labeled agar slants as shown in Figure 3.4.
2. Incubate all slants at 37°C for 18 to 24 hours.
Procedure Lab Two
1. In the chart provided in Part B of the Lab Report, complete the following:
a. Draw and indicate the type of growth of each pure-culture isolate, using Figure 4.1 on page 30 as a reference.
b. Observe the color of the growth and record its pigmentation.
c. Indicate the name of the isolated organisms.
 |
| Figure 3.4 Procedure for the preparation of a pure culture |


Cultural Characteristics of Microorganisms
LEARNING OBJECTIVE
Once you have completed this experiment, you should be able to
1. Determine the cultural characteristics of microorganisms as an aid in identifying and classifying organisms into taxonomic groups.
Principle
When grown on a variety of media, microorganisms will exhibit differences in the macroscopic appearance of their growth. These differences, called cultural characteristics, are used as a basis for separating microorganisms into taxonomic groups. The cultural characteristics for all known microorganisms are contained in Bergey’s Manual of Systematic Bacteriology. They are determined by culturing the organisms on nutrient agar slants and plates, in nutrient broth, and in nutrient gelatin. The patterns of growth to be considered in each of these media are described below, and some are illustrated in Figure 4.1.
Nutrient Agar Slants
These have a single straight line of inoculation on the surface and are evaluated in the following manner:
1. Abundance of growth: The amount of growth is designated as none, slight, moderate, or large.
2. Pigmentation: Chromogenic microorganisms may produce intracellular pigments that are responsible for the coloration of the organisms as seen in surface colonies. Other organisms produce extracellular soluble pigments that are excreted into the medium and that also produce a color. Most organisms, however, are nonchromogenic and will appear white to gray.
3. Optical characteristics: Optical characteristics may be evaluated on the basis of the amount of light transmitted through the growth. These characteristics are described as opaque (no light transmission), translucent (partial transmission), or transparent (full transmission).
4. Form: The appearance of the single-line streak of growth on the agar surface is designated as
a. Filiform: Continuous, threadlike growth with smooth edges.
b. Echinulate: Continuous, threadlike growth with irregular edges.
c. Beaded: Nonconfluent to semiconfluent colonies.
d. Effuse: Thin, spreading growth.
e. Arborescent: Treelike growth.
f. Rhizoid: Rootlike growth.
5. Consistency:
a. Dry: Free from moisture.
b. Buttery: Moist and shiny.
c. Mucoid: Slimy and glistening.
Nutrient Agar Plates
These demonstrate well-isolated colonies and are evaluated in the following manner:
1. Size: Pinpoint, small, moderate, or large.
2. Pigmentation: Color of colony.
3. Form: The shape of the colony is described as follows:
a. Circular: Unbroken, peripheral edge.
b. Irregular: Indented, peripheral edge.
c. Rhizoid: Rootlike, spreading growth.
4. Margin: The appearance of the outer edge of the colony is described as follows:
a. Entire: Sharply defined, even.
b. Lobate: Marked indentations.
c. Undulate: Wavy indentations.
d. Serrate: Toothlike appearance.
e. Filamentous: Threadlike, spreading edge.
5. Elevation: The degree to which colony growth is raised on the agar surface is described as follows:
a. Flat: Elevation not discernible.
b. Raised: Slightly elevated.
c. Convex: Dome-shaped elevation.
d. Umbonate: Raised, with elevated convex central region.
 |
| Figure 4.1 Cultural characteristics of bacteria |
Nutrient Broth Cultures
These are evaluated as to the distribution and appearance of the growth as follows:
1. Uniform fine turbidity: Finely dispersed growth throughout.
2. Flocculent: Flaky aggregates dispersed throughout.
3. Pellicle: Thick, padlike growth on surface.
4. Sediment: Concentration of growth at the bottom of broth culture may be granular, flaky, or flocculant.
Nutrient Gelatin
This solid medium may be liquefied by the enzymatic action of gelatinase. Liquefaction occurs in a variety of patterns:
1. Crateriform: Liquefied surface area is saucer-shaped.
2. Napiform: Bulbous-shaped liquefaction at surface.
3. Infundibuliform: Funnel-shaped.
4. Saccate: Elongated, tubular.
5. Stratiform: Complete liquefaction of the upper half of the medium.
CLINICAL APPLICATION
Examining Colony Growth Characteristics to Aid Identification
Bacterial species each have a characteristic pattern of colony growth in a liquid culture or on a solid medium. While not truly a diagnostic tool, recognition of these patterns of characteristics will aid in a clinical lab setting by helping to minimize the list of potential bacterial species to test for.
Materials
Cultures
24-hour nutrient broth cultures of Pseudomonas aeruginosa, Bacillus cereus, Micrococcus luteus, and Escherichia coli. 72- to 96-hour Trypticase soy broth culture of Mycobacterium smegmatis.
Media
Per designated student group: five each of nutrient agar slants, nutrient agar plates, nutrient broth tubes, and nutrient gelatin tubes.
Equipment
Bunsen burner, inoculating loop and needle, and glassware marking pencil.
Procedure Lab One
1. Using aseptic technique, inoculate each of the appropriately labeled media listed below in the following manner:
a. Nutrient agar slants: With a sterile needle, make a single-line streak of each of the cultures provided, starting at the butt and drawing the needle up the center of the slanted agar surface.
b. Nutrient agar plates: With a sterile loop, prepare a streak-plate inoculation of each of the cultures for the isolation of discrete colonies.
c. Nutrient broth cultures: Using a sterile loop, inoculate each organism into a tube of nutrient broth. Shake the loop a few times to dislodge the inoculum.
d. Nutrient gelatin: Using a sterile needle, prepare a stab inoculation of each of the cultures provided.
2. Incubate all cultures at 37°C for 24 to 48 hours.
Procedure Lab Two
1. Before beginning observation of all the cultures, place the gelatin cultures in a refrigerator for 30 minutes or in a beaker of crushed ice for a few minutes. The gelatin culture will be the last to be observed.
2. Refer to Figure 4.1 on page 30 and the descriptions presented in the introductory section of Experiment 4 while making the following observations:
a. Nutrient agar slants: Observe each of the nutrient agar slant cultures for the amount, pigmentation, form, and consistency of the growth. Record your observations in the chart provided in the Lab Report.
b. Nutrient agar plates: Observe a single, well-isolated colony on each of the nutrient agar plate cultures and identify its size, elevation, margin, form, and pigmentation. Record your observations in the chart provided in the Lab Report.
c. Nutrient broth cultures: Observe each of the nutrient broth cultures for the appearance of growth (flocculation, turbidity, sediment, or pellicle). Record your observations in the chart provided in the Lab Report.
d. Nutrient gelatin: Remove gelatin cultures from the refrigerator or beaker of crushed ice, and observe whether liquefaction of the medium has developed and whether the organism has produced gelatinase. Record your observations in the chart provided in the Lab Report.


Microscopy
LEARNING OBJECTIVES
Once you have completed the experiments in this section, you should be
1. Familiar with the history and diversity of microscopic instruments.
2. Able to understand the components, use, and care of the brightfield microscope.
3. Able to correctly use the microscope for observation and measurement of microorganisms.
Introduction
Microbiology, the branch of science that has so vastly extended and expanded our knowledge of the living world, owes its existence to Antoni van Leeuwenhoek. In 1673, with the aid of a crude microscope consisting of a biconcave lens enclosed in two metal plates, Leeuwenhoek introduced the world to the existence of microbial forms of life. Over the years, microscopes have evolved from the simple, singlelens instrument of Leeuwenhoek, with a magnification of 300*, to the present-day electron microscopes capable of magnifications greater than 250,000*.
Microscopes are designated as either light microscopes or electron microscopes. The former use visible light or ultraviolet rays to illuminate specimens. They include brightfield, darkfield, phase-contrast, and fluorescent instruments. Fluorescent microscopes use ultraviolet radiations whose wavelengths are shorter than those of visible light and are not directly perceptible to the human eye. Electron microscopes use electron beams (instead of light rays) and magnets (instead of lenses) to observe submicroscopic particles.
Essential Features of Various Microscopes
Brightfield Microscope This instrument contains two-lens systems for magnifying specimens: the ocular lens in the eyepiece and the objective lens located in the nosepiece. The specimen is illuminated by a beam of tungsten light focused on it by a substage lens called a condenser; the result is a specimen that appears dark against a bright background. A major limitation of this system is the absence of contrast between the specimen and the surrounding medium, which makes it difficult to observe living cells. Therefore, most brightfield observations are performed on nonviable, stained preparations.
Darkfield Microscope This is similar to the ordinary light microscope; however, the condenser system is modified so that the specimen is not illuminated directly. The condenser directs the light obliquely so that the light is deflected or scattered from the specimen, which then appears bright against a dark background. Living specimens may be observed more readily with darkfield than with brightfield microscopy.
Phase-Contrast Microscope Observation of microorganisms in an unstained state is possible with this microscope. Its optics include special objectives and a condenser that make visible cellular components that differ only slightly in their refractive indexes. As light is transmitted through a specimen with a refractive index different from that of the surrounding medium, a portion of the light is refracted (bent) due to slight variations in density and thickness of the cellular components. The special optics convert the difference between transmitted light and refracted rays, resulting in a significant variation in the intensity of light and thereby producing a discernible image of the structure under study. The image appears dark against a light background.
Fluorescent Microscope This microscope is used most frequently to visualize specimens that are chemically tagged with a fluorescent dye. The source of illumination is an ultraviolet (UV) light obtained from a high-pressure mercury lamp or hydrogen quartz lamp. The ocular lens is fitted with a filter that permits the longer ultraviolet wavelengths to pass, while the shorter wavelengths are blocked or eliminated. Ultraviolet radiations are absorbed by the fluorescent label, and the energy is re-emitted in the form of a different wavelength in the visible light range. The fluorescent dyes absorb at wavelengths between 230 and 350 nanometers (nm) and emit orange, yellow, or greenish light. This microscope is used primarily for the detection of antigen-antibody reactions. Antibodies are conjugated with a fluorescent dye that becomes excited in the presence of ultraviolet light, and the fluorescent portion of the dye becomes visible against a black background.
Electron Microscope This instrument provides a revolutionary method of microscopy, with magnifications up to 1 million*. This permits visualization of submicroscopic cellular particles as well as viral agents. In the electron microscope, the specimen is illuminated by a beam of electrons rather than light, and the focusing is carried out by electromagnets instead of a set of optics. These components are sealed in a tube in which a complete vacuum is established. Transmission electron microscopes require specimens that are prepared as thin filaments, fixed and dehydrated for the electron beam to pass freely through them. As the electrons pass through the specimen, images are formed by directing the electrons onto photographic film, thus making internal cellular structures visible. Scanning electron microscopes are used for visualizing surface characteristics rather than intracellular structures. A narrow beam of electrons scans back and forth, producing a three-dimensional image as the electrons are reflected off the specimen’s surface.
While scientists have a variety of optical instruments with which to perform routine laboratory procedures and sophisticated research, the compound brightfield microscope is the “workhorse” and is commonly found in all biological laboratories. Although you should be familiar with the basic principles of microscopy, you probably have not been exposed to this diverse array of complex and expensive equipment. Therefore, only the compound brightfield microscope will be discussed in depth and used to examine specimens.
Microscopic Examination of Stained Cell Preparations
LEARNING OBJECTIVES
Once you have completed this experiment, you should be familiar with the
1. Theoretical principles of brightfield microscopy.
2. Component parts of the compound microscope.
3. Use and care of the compound microscope.
4. Practical use of the compound microscope for visualization of cellular morphology from stained slide preparations.
Principle
Microbiology is a science that studies living organisms that are too small to be seen with the naked eye. Needless to say, such a study must involve the use of a good compound microscope. Although there are many types and variations, they all fundamentally consist of a two-lens system, a variable but controllable light source, and mechanical adjustable parts for determining focal length between the lenses and specimen (Figure 5.1).
Components of the Microscope
Stage A fixed platform with an opening in the center allows the passage of light from an illuminating source below to the lens system above the stage. This platform provides a surface for the placement of a slide with its specimen over the central opening. In addition to the fixed stage, most microscopes have a mechanical stage that can be moved vertically or horizontally by means of adjustment controls. Less sophisticated microscopes have clips on the fixed stage, and the slide must be positioned manually over the central opening.
Illumination The light source is positioned in the base of the instrument. Some microscopes are equipped with a built-in light source to provide direct illumination. Others are provided with a reversible mirror that has one side flat and the other concave. An external light source, such as a lamp, is placed in front of the mirror to direct the light upward into the lens system. The flat side of the mirror is used for artificial light, and the concave side for sunlight.
Abbé Condenser This component is found directly under the stage and contains two sets of lenses that collect and concentrate light as it passes upward from the light source into the lens systems. The condenser is equipped with an iris diaphragm, a shutter controlled by a lever that is used to regulate the amount of light entering the lens system.
Body Tube Above the stage and attached to the arm of the microscope is the body tube. This structure houses the lens system that magnifies the specimen. The upper end of the tube contains the ocular or eyepiece lens. The lower portion consists of a movable nosepiece containing the objective lenses. Rotation of the nosepiece positions objectives above the stage opening. The body tube may be raised or lowered with the aid of coarse-adjustment and fine-adjustment knobs that are located above or below the stage, depending on the type and make of the instrument.
Theoretical Principles of Microscopy
To use the microscope efficiently and with minimal frustration, you should understand the basic principles of microscopy: magnification, resolution, numerical aperture, illumination, and focusing.
Magnification Enlargement, or magnification, of a specimen is the function of a two-lens system; the ocular lens is found in the eyepiece, and the objective lens is situated in a revolving nosepiece. These lenses are separated by the body tube. The objective lens is nearer the specimen and magnifies it, producing the real image that is projected up into the focal plane and then magnified by the ocular lens to produce the final image.
( Head, Body tube, Arm, Mechanical stage, Course adjustment knob, Fine adjustment knob, Condenser adjustment knob, Base, Ocular (eyepiece) lenses, Nosepiece, Objective lenses, Stage, Condenser, Diaphragm, Substage light, Power switch )
The most commonly used microscopes are equipped with a revolving nosepiece containing four objective lenses, each possessing a different degree of magnification. When these are combined with the magnification of the ocular lens, the total or overall linear magnification of the specimen is obtained. This is shown in Table 5.1.
Resolving Power or Resolution Although magnification is important, you must be awarethat unlimited enlargement is not possible by merely increasing the magnifying power of the lenses or by using additional lenses, because lenses are limited by a property called resolving power. By definition, resolving power is how far apart two adjacent objects must be before a given lens shows them as discrete entities. When a lens cannot discriminate, that is, when the two objects appear as one, it has lost resolution. Increased magnification will not rectify the loss and will, in fact, blur the object. The resolving power of a lens is dependent on the wavelength of light used and the numerical aperture, which is a characteristic of each lens and imprinted on each objective. The numerical aperture is defined as a function of the diameter of the objective lens in relation to its focal length. It is doubled by use of the substage condenser, which illuminates the object with rays of light that pass through the specimen obliquely as well as directly. Thus, resolving power is expressed mathematically as follows:
Preparation of Bacterial Smears
LEARNING OBJECTIVES
Once you have completed the experiments in this section, you should be
1. Familiar with the history and diversity of microscopic instruments.
2. Able to understand the components, use, and care of the brightfield microscope.
3. Able to correctly use the microscope for observation and measurement of microorganisms.
Introduction
Microbiology, the branch of science that has so vastly extended and expanded our knowledge of the living world, owes its existence to Antoni van Leeuwenhoek. In 1673, with the aid of a crude microscope consisting of a biconcave lens enclosed in two metal plates, Leeuwenhoek introduced the world to the existence of microbial forms of life. Over the years, microscopes have evolved from the simple, singlelens instrument of Leeuwenhoek, with a magnification of 300*, to the present-day electron microscopes capable of magnifications greater than 250,000*.
Microscopes are designated as either light microscopes or electron microscopes. The former use visible light or ultraviolet rays to illuminate specimens. They include brightfield, darkfield, phase-contrast, and fluorescent instruments. Fluorescent microscopes use ultraviolet radiations whose wavelengths are shorter than those of visible light and are not directly perceptible to the human eye. Electron microscopes use electron beams (instead of light rays) and magnets (instead of lenses) to observe submicroscopic particles.
Essential Features of Various Microscopes
Brightfield Microscope This instrument contains two-lens systems for magnifying specimens: the ocular lens in the eyepiece and the objective lens located in the nosepiece. The specimen is illuminated by a beam of tungsten light focused on it by a substage lens called a condenser; the result is a specimen that appears dark against a bright background. A major limitation of this system is the absence of contrast between the specimen and the surrounding medium, which makes it difficult to observe living cells. Therefore, most brightfield observations are performed on nonviable, stained preparations.
Darkfield Microscope This is similar to the ordinary light microscope; however, the condenser system is modified so that the specimen is not illuminated directly. The condenser directs the light obliquely so that the light is deflected or scattered from the specimen, which then appears bright against a dark background. Living specimens may be observed more readily with darkfield than with brightfield microscopy.
Phase-Contrast Microscope Observation of microorganisms in an unstained state is possible with this microscope. Its optics include special objectives and a condenser that make visible cellular components that differ only slightly in their refractive indexes. As light is transmitted through a specimen with a refractive index different from that of the surrounding medium, a portion of the light is refracted (bent) due to slight variations in density and thickness of the cellular components. The special optics convert the difference between transmitted light and refracted rays, resulting in a significant variation in the intensity of light and thereby producing a discernible image of the structure under study. The image appears dark against a light background.
Fluorescent Microscope This microscope is used most frequently to visualize specimens that are chemically tagged with a fluorescent dye. The source of illumination is an ultraviolet (UV) light obtained from a high-pressure mercury lamp or hydrogen quartz lamp. The ocular lens is fitted with a filter that permits the longer ultraviolet wavelengths to pass, while the shorter wavelengths are blocked or eliminated. Ultraviolet radiations are absorbed by the fluorescent label, and the energy is re-emitted in the form of a different wavelength in the visible light range. The fluorescent dyes absorb at wavelengths between 230 and 350 nanometers (nm) and emit orange, yellow, or greenish light. This microscope is used primarily for the detection of antigen-antibody reactions. Antibodies are conjugated with a fluorescent dye that becomes excited in the presence of ultraviolet light, and the fluorescent portion of the dye becomes visible against a black background.
Electron Microscope This instrument provides a revolutionary method of microscopy, with magnifications up to 1 million*. This permits visualization of submicroscopic cellular particles as well as viral agents. In the electron microscope, the specimen is illuminated by a beam of electrons rather than light, and the focusing is carried out by electromagnets instead of a set of optics. These components are sealed in a tube in which a complete vacuum is established. Transmission electron microscopes require specimens that are prepared as thin filaments, fixed and dehydrated for the electron beam to pass freely through them. As the electrons pass through the specimen, images are formed by directing the electrons onto photographic film, thus making internal cellular structures visible. Scanning electron microscopes are used for visualizing surface characteristics rather than intracellular structures. A narrow beam of electrons scans back and forth, producing a three-dimensional image as the electrons are reflected off the specimen’s surface.
While scientists have a variety of optical instruments with which to perform routine laboratory procedures and sophisticated research, the compound brightfield microscope is the “workhorse” and is commonly found in all biological laboratories. Although you should be familiar with the basic principles of microscopy, you probably have not been exposed to this diverse array of complex and expensive equipment. Therefore, only the compound brightfield microscope will be discussed in depth and used to examine specimens.
Microscopic Examination of Stained Cell Preparations
LEARNING OBJECTIVES
Once you have completed this experiment, you should be familiar with the
1. Theoretical principles of brightfield microscopy.
2. Component parts of the compound microscope.
3. Use and care of the compound microscope.
4. Practical use of the compound microscope for visualization of cellular morphology from stained slide preparations.
Principle
Microbiology is a science that studies living organisms that are too small to be seen with the naked eye. Needless to say, such a study must involve the use of a good compound microscope. Although there are many types and variations, they all fundamentally consist of a two-lens system, a variable but controllable light source, and mechanical adjustable parts for determining focal length between the lenses and specimen (Figure 5.1).
Components of the Microscope
Stage A fixed platform with an opening in the center allows the passage of light from an illuminating source below to the lens system above the stage. This platform provides a surface for the placement of a slide with its specimen over the central opening. In addition to the fixed stage, most microscopes have a mechanical stage that can be moved vertically or horizontally by means of adjustment controls. Less sophisticated microscopes have clips on the fixed stage, and the slide must be positioned manually over the central opening.
Illumination The light source is positioned in the base of the instrument. Some microscopes are equipped with a built-in light source to provide direct illumination. Others are provided with a reversible mirror that has one side flat and the other concave. An external light source, such as a lamp, is placed in front of the mirror to direct the light upward into the lens system. The flat side of the mirror is used for artificial light, and the concave side for sunlight.
Abbé Condenser This component is found directly under the stage and contains two sets of lenses that collect and concentrate light as it passes upward from the light source into the lens systems. The condenser is equipped with an iris diaphragm, a shutter controlled by a lever that is used to regulate the amount of light entering the lens system.
Body Tube Above the stage and attached to the arm of the microscope is the body tube. This structure houses the lens system that magnifies the specimen. The upper end of the tube contains the ocular or eyepiece lens. The lower portion consists of a movable nosepiece containing the objective lenses. Rotation of the nosepiece positions objectives above the stage opening. The body tube may be raised or lowered with the aid of coarse-adjustment and fine-adjustment knobs that are located above or below the stage, depending on the type and make of the instrument.
Theoretical Principles of Microscopy
To use the microscope efficiently and with minimal frustration, you should understand the basic principles of microscopy: magnification, resolution, numerical aperture, illumination, and focusing.
Magnification Enlargement, or magnification, of a specimen is the function of a two-lens system; the ocular lens is found in the eyepiece, and the objective lens is situated in a revolving nosepiece. These lenses are separated by the body tube. The objective lens is nearer the specimen and magnifies it, producing the real image that is projected up into the focal plane and then magnified by the ocular lens to produce the final image.
 |
| Figure 5.1 A compound microscope |
The most commonly used microscopes are equipped with a revolving nosepiece containing four objective lenses, each possessing a different degree of magnification. When these are combined with the magnification of the ocular lens, the total or overall linear magnification of the specimen is obtained. This is shown in Table 5.1.
| TABLE 5.1 | Overall Linear Magnification | |
| MAGNIFICATION | TOTAL MAGNIFICATION | |
| OBJECTIVE LENSES | OCULAR LENS | OBJECTIVE MULTIPLIED BY OCULAR |
| Scanning 4x | 10x | 40x |
| Low-power 10x | 10x | 100x |
| High-power 40x | 10x | 400x |
| Oil-immersion 100x | 10x | 1000x |
Resolving Power or Resolution Although magnification is important, you must be awarethat unlimited enlargement is not possible by merely increasing the magnifying power of the lenses or by using additional lenses, because lenses are limited by a property called resolving power. By definition, resolving power is how far apart two adjacent objects must be before a given lens shows them as discrete entities. When a lens cannot discriminate, that is, when the two objects appear as one, it has lost resolution. Increased magnification will not rectify the loss and will, in fact, blur the object. The resolving power of a lens is dependent on the wavelength of light used and the numerical aperture, which is a characteristic of each lens and imprinted on each objective. The numerical aperture is defined as a function of the diameter of the objective lens in relation to its focal length. It is doubled by use of the substage condenser, which illuminates the object with rays of light that pass through the specimen obliquely as well as directly. Thus, resolving power is expressed mathematically as follows:
 |
| resolving power, wavelength of light, 2 x numerical aperture |
Preparation of Bacterial Smears
LEARNING OBJECTIVE
Once you have completed this experiment, you should be able to
1. Prepare bacterial smears for the microscopic visualization of bacteria.
Principle
Bacterial smears must be prepared prior to the execution of any of the staining techniques listed in Figure P3.6 on page 57. Although not difficult, the preparation requires adequate care.
Meticulously follow the rules listed below.
1. Preparation of the glass microscope slide: Clean slides are essential for the preparation of microbial smears. Grease or oil from the fingers on slides must be removed by washing the slides with soap and water or scouring powders such as Bon Ami®, followed by a water rinse and a rinse of 95% alcohol. After cleaning, dry the slides and place them on laboratory towels until ready for use. Note: Remember to hold the clean slides by their edges.
2. Labeling of slides: Proper labeling of the slide is essential. The initials of the organism can be written on either end of the slide with a glassware marking pencil on the surface on which the smear is to be made. Care should be taken that the label does not come into contact with staining reagents.
3. Preparation of smear: It is crucial to avoid thick, dense smears. A thick or dense smear occurs when too much of the culture is used in its preparation, which concentrates a large number of cells on the slide. This type of preparation diminishes the amount of light that can pass through and makes it difficult to visualize the morphology of single cells.
Note: Smears require only a small amount of the bacterial culture. A good smear is one that, when dried, appears as a thin whitish layer or film. The print of your textbook should be legible through the smear. Different techniques are used depending on whether the smear is made from a broth or solidmedium culture.
a. Broth cultures: Resuspend the culture by tapping the tube with your finger. Depending on the size of the loop, one or two loopfuls should be applied to the center of the slide with a sterile inoculating loop and spread evenly over an area about the size of a dime. Set the smears on the laboratory table and allow to air-dry.
b. Cultures from solid medium: Organisms cultured in a solid medium produce thick, dense surface growth and are not amenable to direct transfer to the glass slide.
These cultures must be diluted by placing one or two loopfuls of water on the center of the slide in which the cells will be emulsified. Transfer of the cells requires the use of a sterile inoculating loop or a needle, if preferred. Only the tip of the loop or needle should touch the culture to prevent the transfer of too many cells. Suspension is accomplished by spreading the cells in a circular motion in the drop of water with the loop or needle. This helps to avoid cell clumping. The finished smear should occupy an area about the size of a nickel and should appear as a translucent, or semitransparent, confluent whitish film (Figure 8.1). At this point the smear should be allowed to dry completely. Note: Do not blow on slide or wave it in the air.
4. Heat fixation: Unless fixed on the glass slide, the bacterial smear will wash away during the staining procedure. This is avoided by heat fixation, during which the bacterial proteins are coagulated and fixed to the glass surface. Heat fixation is performed by the rapid passage of the air-dried smear two or three times over the flame of the Bunsen burner.
The preparation of a bacterial smear is illustrated in Figure 8.2.
 |
| Figure 8.1 A bacterial smear following fixation |
CLINICAL APPLICATION
Proper Slide Preparation
Before any staining or visualization of a bacterial sample can take place, a proper smear must be prepared. A smear that is too thick may give a false result due to retention of dye that should have been rinsed away or because the thickness may prevent dye penetration. A smear that is too thin may have too few cells, increasing the time and energy to find the bacteria under magnification. Inconclusive results due to improperly prepared slides may have an impact on patient treatment and outcomes. Good smears are those which allow newsprint to be read through the smear.
Materials
Cultures
24-hour nutrient agar slant culture of Bacillus
cereus and a 24-hour nutrient broth culture of
Staphylococcus aureus.
Equipment
Glass microscope slides, Bunsen burner, inoculating
loop and needle, and glassware marking pencil.
Procedure
Smears from a Broth Medium
Label three clean slides with the initials of the organism, and number them 1, 2, and 3. Resuspend the sedimented cells in the broth culture by tapping the culture tube with your finger. The next four steps of this procedure are illustrated in Figure 8.2a and c:
1. With a sterile loop, place one loopful of culture on Slide 1, two loopfuls on Slide 2, and three loopfuls on Slide 3, respectively.
2. With a circular movement of the loop, spread the cell suspension into an area approximately the size of a dime.
3. Allow the slide to air-dry completely.
4. Heat fix the preparation. Note: Pass the airdried slide through the outer portion of the Bunsen flame to prevent overheating, which can distort the morphology through plasmolysis of the cell wall.
Examine each slide for the confluent, whitish film or haze and record your results in the Lab Report.
Smears from a Solid Medium
Label four clean slides with the initials of the organism. Label Slides 1 and 2 with an L for loop, and Slides 3 and 4 with an N for needle. The next four steps of this procedure are illustrated in Figure 8.2b and c:
1. Using a loop, place one to two loops of water on each slide.
2. With a sterile loop, touch the entire loop to the culture and emulsify the cells in water on Slide 1. Then, with a sterile loop, just touch the tip of the loop to the culture and emulsify it in the water on Slide 2. Repeat Steps 1 and 2 using a sterile inoculating needle on Slides 3 and 4.
3. Allow all slides to air-dry completely.
4. Heat fix the preparation.
Examine each slide for the confluent, whitish film or haze and record your results in the Lab Report.
 |
| Figure 8.2 Bacterial smear preparation |
Simple Staining
LEARNING OBJECTIVES
Once you have completed this experiment, you should be able to
1. Perform a simple staining procedure.
2. Compare the morphological shapes and arrangements of bacterial cells.
Principle
In simple staining, the bacterial smear is stained with a single reagent, which produces a distinctive contrast between the organism and its background. Basic stains with a positively charged chromogen are preferred because bacterial nucleic acids and certain cell wall components carry a negative charge that strongly attracts and binds to the cationic chromogen. The purpose of simple staining is to elucidate the morphology and arrangement of bacterial cells (Figure 9.1). The most commonly used basic stains are methylene blue, crystal violet, and carbol fuchsin.
CLINICAL APPLICATION
Quick and Simple Stain
Simple stains are relatively quick and useful methods of testing for the presence of, determining the shape of, or determining the numbers of bacteria present in a sample. Generally involving a single staining step, simple staining methods are not considered differential or diagnostic and will have limited uses. However, this is a quick procedure for determining whether a clinical sample has the presence of a foreign bacterial pathogen.
Materials
Cultures
24-hour nutrient agar slant cultures of Escherichia coli and Bacillus cereus and a 24-hour nutrient broth culture of Staphylococcus aureus. Alternatively, use the smears prepared in Experiment 8.
 |
| Figure 9.1 Bacterial shapes and arrangements |
Reagents
Methylene blue, crystal violet, and carbol fuchsin.
Equipment
Bunsen burner, inoculating loop, staining tray, microscope, lens paper, bibulous (highly absorbent) paper, and glass slides.
Procedure
1. Prepare separate bacterial smears of the organisms following the procedure described in Experiment 8. Note: All smears must be heat fixed prior to staining.
Simple Staining
The following steps are illustrated in Figure 9.2.
1. Place a slide on the staining tray and flood the smear with one of the indicated stains, using the appropriate exposure time for each: carbol fuchsin, 15 to 30 seconds; crystal violet, 20 to 60 seconds; methylene blue (shown in Figure 9.2), 1 to 2 minutes.
2. Gently wash the smear with tap water to remove excess stain. During this step, hold the slide parallel to the stream of water; in this way you can reduce the loss of organisms from the preparation.
3. Using bibulous paper, blot dry but do not wipe the slide.
4. Repeat this procedure with the remaining two organisms, using a different stain for each.
5. Examine all stained slides under oil immersion.
6. In the chart provided in the Lab Report, complete the following:
a. Draw a representative field for each organism.
Refer to page xvi for proper drawing procedure.
b. Describe the morphology of the organisms with reference to their shapes (bacilli, cocci, spirilla) and arrangements (chains, clusters, pairs). Refer to the photographs in Figure 9.3.
 |
| Figure 9.2 Simple staining procedure |
 | ||
| Figure 9.3 Micrographs showing bacteria | morphology |

Negative Staining
LEARNING OBJECTIVES
Once you have completed this experiment, you should be able to
1. Perform a negative staining procedure.
2. Understand the benefit obtained from visualizing unstained microorganisms.
Principle
Negative staining requires the use of an acidic stain such as India ink or nigrosin. The acidic stain, with its negatively charged chromogen, will not penetrate the cells because of the negative charge on the surface of bacteria. Therefore, the unstained cells are easily discernible against the colored background.
The practical application of negative staining is twofold. First, since heat fixation is not required and the cells are not subjected to the distorting effects of chemicals and heat, their natural size and shape can be seen. Second, it is possible to observe bacteria that are difficult to stain, such as some spirilla. Because heat fixation is not done during the staining process, keep in mind that the organisms are not killed and slides should be handled with care. Figure 10.1 shows a negative stain of bacilli.
 |
| Figure 10.1 Negative staining: Bacilli (1000 ×) |
CLINICAL APPLICATION
Detecting Encapsulated Invaders
The principle application of negative staining is to determine if an organism possesses a capsule (a gelatinous outer layer that makes the microorganism more virulent), although it can also be used to demonstrate spore formation. The technique is frequently used in the identification of fungi such as Cryptococcus neoformans, an important infectious agent found in bird dropping that is linked to meningeal and lung infections in humans.
Materials
Cultures
24-hour agar slant cultures of Micrococcus luteus, Bacillus cereus, and Aquaspirillum itersonii.
Reagent
Nigrosin.
Equipment
Bunsen burner, inoculating loop, staining tray, glass slides, lens paper, and microscope.
Procedure
Steps 1–4 are illustrated in Figure 10.2.
1. Place a small drop of nigrosin close to one end of a clean slide.
2. Using aseptic technique, place a loopful of inoculum from the M. luteus culture in the drop of nigrosin and mix.
3. Place a slide against the drop of suspended organisms at a 45° angle and allow the drop to spread along the edge of the applied slide.
4. Push the slide away from the drop of suspended organisms to form a thin smear.
Air-dry. Note: Do not heat fix the slide.
5. Repeat Steps 1–4 for slide preparations of B. cereus and A. itersonii.
6. Examine the slides under oil immersion, and record your observations in the Lab Report.
 |
| Figure 10.2 Negative staining procedure |

Gram Stain
LEARNING OBJECTIVES
Once you have completed this experiment, you should understand
1. The chemical and theoretical basis for differential staining procedures.
2. The chemical basis for the Gram stain.
3. The procedure for differentiating between two principal groups of bacteria: Gram positive and Gram negative.
Principle
Differential staining requires the use of at least four chemical reagents that are applied sequentially to a heat-fixed smear. The first reagent is called the primary stain. Its function is to impart its color to all cells. The second stain is a mordant used to intensify the color of the primary stain. In order to establish a color contrast, the third reagent used is the decolorizing agent. Based on the chemical composition of cellular components, the decolorizing agent may or may not remove the primary stain from the entire cell or only from certain cell structures. The final reagent, the counterstain, has a contrasting color to that of the primary stain. Following decolorization, if the primary stain is not washed out, the counterstain cannot be absorbed and the cell or its components will retain the color of the primary stain. If the primary stain is removed, the decolorized cellular components will accept and assume the contrasting color of the counterstain. In this way, cell types or their structures can be distinguished from each other on the basis of the stain that is retained.
The most important differential stain used in bacteriology is the Gram stain, named after Dr. Hans Christian Gram. It divides bacterial cells into two major groups, gram-positive and gram-negative, which makes it an essential tool for classification and differentiation of microorganisms. Figure 11.1 shows gram-positive and gram-negative stained cells. The Gram stain reaction is based on the difference in the chemical composition of bacterial cell walls. Gram-positive cells have a thick peptidoglycan layer, whereas the peptidoglycan layer in gram-negative cells is much thinner and surrounded by outer lipidcontaining layers. Peptidoglycan is mainly a polysaccharide composed of two chemical subunits found only in the bacterial cell wall. These subunits are Nacetylglucosamine and N-acetylmuramic acid. With some organisms, as the adjacent layers of peptidoglycan are formed, they are cross-linked by short chains of peptides by means of a transpeptidase enzyme, resulting in the shape and rigidity of the cell wall. In the case of gram-negative bacteria and several of the gram-positive such as the Bacillus, the cross-linking of the peptidoglycan layer is direct because the bacteria do not have short peptide tails. Early experiments have shown that a gram-positive cell denuded of its cell wall by the action of lysozyme or penicillin will stain gram-negative.
The Gram stain uses four different reagents. Descriptions of these reagents and their mechanisms of action follow. Figure 11.2 shows the microscopic appearance of cells at each step of the Gram staining procedure.
 |
| Figure 11.1 Gram-stained cells |
 |
| Figure 11.2 Microscopic observation of cells following steps in the Gram staining procedure |
Primary Stain
Crystal Violet (Hucker’s) This violet stain is used first and stains all cells purple.
Mordant
Gram’s Iodine This reagent serves not only as a killing agent but also as a mordant, a substance that increases the cells’ affinity for a stain. It does this by binding to the primary stain, thus forming an insoluble complex. The resultant crystal-violet–iodine (CV-I) complex serves to intensify the color of the stain. At this point, all cells will appear purple-black.
Decolorizing Agent
Ethyl Alcohol, 95% This reagent serves a dual function as a protein-dehydrating agent and as a lipid solvent. Its action is determined by two factors, the concentration of lipids and the thickness of the peptidoglycan layer in bacterial cell walls. In gram-negative cells, the alcohol increases the porosity of the cell wall by dissolving the lipids in the outer layers. Thus, the CV-I complex can be more easily removed from the thinner and less highly cross-linked peptidoglycan layer. Therefore, the washing-out effect of the alcohol facilitates the release of the unbound CV-I complex, leaving the cells colorless or unstained. The much thicker peptidoglycan layer in gram-positive cells is responsible for the more stringent retention of the CV-I complex, as the pores are made smaller due to the dehydrating effect of the alcohol. Thus, the tightly bound primary stain complex is difficult to remove, and the cells remain purple. Note: Be careful not to over-decolorize the smear with alcohol.
Counterstain
Safranin This is the final reagent, used to stain pink those cells that have been previously decolorized. Since only gram-negative cells undergo decolorization, they may now absorb the counterstain. Gram-positive cells retain the purple color of the primary stain.
The preparation of adequately stained smears requires that you bear in mind the following precautions:
1. The most critical phase of the procedure is the decolorization step, which is based on the ease with which the CV-I complex is released from the cell. Remember that over-decolorization will result in loss of the primary stain, causing gram-positive organisms to appear gramnegative. Under-decolorization, however, will not completely remove the CV-I complex, causing gram-negative organisms to appear grampositive. Strict adherence to all instructions will help remedy part of the difficulty, but individual experience and practice are the keys to correct decolorization.
2. It is imperative that, between applications of the reagents, slides be thoroughly washed under running water or water applied with an eyedropper. This removes excess reagent and prepares the slide for application of the subsequent reagent.
3. The best Gram-stained preparations are made with fresh cultures, that is, not older than 24 hours. As cultures age, especially in the case of gram-positive cells, the organisms tend to lose their ability to retain the primary stain and may appear to be gram-variable; that is, some cells will appear purple, while others will appear pink.
CLINICAL APPLICATION
Gram Staining: The First Diagnostic Test
The Gram stain is a diagnostic staining procedure that can be done on body fluids, tissue biopsies, throat cultures, samples from abscesses when infection is suspected, and more. Clinically important results are obtained much more rapidly from staining than from culturing the specimen. The results of the Gram stain will aid a clinical lab in determining which additional tests may be required for identification of the bacterial strain in question. Once the bacterial gram type, shape, and orientation are determined, it expedites the appropriate choice of antibiotic needed to treat the patient.
Materials
Cultures
24-hour nutrient agar slant cultures of Escherichia coli, Staphylococcus aureus, and Bacillus cereus.
Reagents
Crystal violet, Gram’s iodine, 95% ethyl alcohol, and safranin.
Equipment
Bunsen burner, inoculating loop or needle, staining tray, glass slides, bibulous paper, lens paper, and microscope.
Procedure
Smear Preparation
1. Obtain four clean glass slides.
2. Using aseptic technique, prepare a smear of each of the three organisms and on the remaining slide prepare a smear consisting of a mixture of S. aureus and E. coli. Do this by placing a drop of water on the slide, and then transferring each organism separately to the drop of water with a sterile, cooled loop. Mix and spread both organisms by means of a circular motion of the inoculating loop.
3. Allow smears to air-dry and then heat fix in the usual manner.
Gram Staining
The following steps are shown in Figure 11.3.
1. Gently flood smears with crystal violet and let stand for 1 minute.
2. Gently wash with tap water.
3. Gently flood smears with the Gram’s iodine mordant and let stand for 1 minute.
4. Gently wash with tap water.
5. Decolorize with 95% ethyl alcohol. Note: Do not over-decolorize. Add reagent drop by drop until the alcohol runs almost clear, showing only a blue tinge.
6. Gently wash with tap water.
7. Counterstain with safranin for 45 seconds.
8. Gently wash with tap water.
9. Blot dry with bibulous paper and examine under oil immersion.
10. As you observe each slide under oil immersion, complete the chart provided in the Lab Report.
a. Draw a representative microscopic field.
b. Describe the cells according to their morphology and arrangement.
c. Describe the color of the stained cells.
d. Classify the organism as to the Gram reaction: gram-positive or gram-negative.
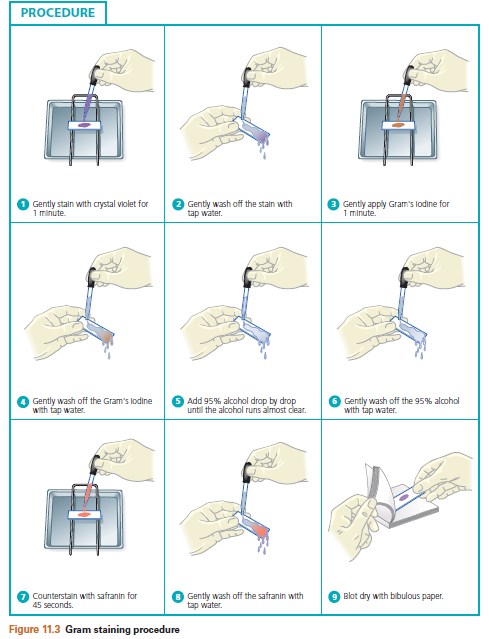 |
| Figure 11.3 Gram staining procedure |

Differential Staining for Visualization of Bacterial Cell Structures
LEARNING OBJECTIVES
Once you have completed this experiment, you should understand
1. The chemical basis for the spore and capsule stains.
2. The procedure for differentiation between the bacterial spore and vegetative cell forms.
3. The procedure to distinguish capsular material from the bacterial cell.
PART A
Spore Stain (Schaeffer Fulton Method)
Principle
Members of the anaerobic genera Clostridium and Desulfotomaculum and the aerobic genus Bacillus are examples of organisms that have the capacity to exist either as metabolically active vegetative cells or as highly resistant, metabolically inactive cell types called spores. When environmental conditions become unfavorable for continuing vegetative cellular activities, particularly with the exhaustion of a nutritional carbon source, these cells have the capacity to undergo sporogenesis and give rise to a new intracellular structure called the endospore, which is surrounded by impervious layers called spore coats. As conditions continue to worsen, the endospore is released from the degenerating vegetative cell and becomes an independent cell called a free spore. Because of the chemical composition of spore layers, the spore is resistant to the damaging effects of excessive heat, freezing, radiation, desiccation, and chemical agents, as well as to the commonly employed microbiological stains. With the return of favorable environmental conditions, the free spore may revert to a metabolically active and less resistant vegetative cell through germination (see Figure 13.1). It should be emphasized that sporogenesis and germination are not means of reproduction but merely mechanisms that ensure cell survival under all environmental conditions.
In practice, the spore stain uses two different reagents.
Primary Stain
Malachite Green Unlike most vegetative cell types that stain by common procedures, the free spore, because of its impervious coats, will not accept the primary stain easily. For further penetration, the application of heat is required. After the primary stain is applied and the smear is heated, both the vegetative cell and spore will appear green.
Decolorizing Agent
Water Once the spore accepts the malachite green, it cannot be decolorized by tap water, which removes only the excess primary stain. The spore remains green. On the other hand, the stain does not demonstrate a strong affinity for vegetative cell components; the water removes it, and these cells will be colorless.
Counterstain
Safranin This contrasting red stain is used as the second reagent to color the decolorized vegetative cells, which will absorb the counterstain and appear red. The spores retain the green of the primary stain. A micrograph of spore-stained cells appears in Figure 13.2.
 |
| Figure 13.1 Life cycle of a spore-forming bacterium |
 | ||
| Figure 13.2 Spore stain showing free spores and | vegetative bacilli |
CLINICAL APPLICATION
Identification of Dangerous Spore-Forming Bacteria
Some spore-forming bacteria can have extremely negative health effects, such as Bacillus anthracis, which causes anthrax, and certain Clostridia bacteria, which are the causative agents for tetanus, gas gangrene, food poisoning, and pseudomembranous colitis. Differential stains can stain endospores inside bacterial cells as well as free spores to identify these pathogenic bacteria.
Materials
Cultures
48- to 72-hour nutrient agar slant culture of Bacillus cereus and thioglycollate culture of Clostridium sporogenes.
Reagents
Malachite green and safranin.
Equipment
Bunsen burner, hot plate, staining tray, inoculating loop, glass slides, bibulous paper, lens paper, and microscope.
Procedure
Smear Preparation
1. Obtain two clean glass slides.
2. Make individual smears in the usual manner using aseptic technique.
3. Allow smear to air-dry, and heat fix in the usual manner.
Spore Staining
Steps 1–5 are illustrated in Figure 13.3.
1. Flood smears with malachite green and place on top of a beaker of water sitting on a warm hot plate, allowing the preparation to steam for 2 to 3 minutes. Note: Do not allow stain to evaporate; replenish stain as needed. Prevent the stain from boiling by adjusting the hot plate temperature.
2. Remove slides from hot plate, cool, and wash under running tap water.
3. Counterstain with safranin for 30 seconds.
4. Wash with tap water.
5. Blot dry with bibulous paper and examine under oil immersion.
6. In the chart provided in the Lab Report, complete the following:
a. Draw a representative microscopic field of each preparation.
b. Describe the location of the endospore within the vegetative cell as central, subterminal, or terminal on each preparation.
c. Indicate the color of the spore and vegetative cell on each preparation.
PART B
Capsule Stain (Anthony Method)
Principle
A capsule is a gelatinous outer layer that is secreted by the cell and that surrounds and adheres to the cell wall. It is not common to all organisms. Cells that have a heavy capsule are generally virulent and capable of producing disease, since the structure protects bacteria against the normal phagocytic activities of host cells. Chemically, the capsular material is composed mainly of complex polysaccharides such as levans, dextrans, and celluloses.
Capsule staining is more difficult than other types of differential staining procedures because the capsular materials are water-soluble and may be dislodged and removed with vigorous washing.
Smears should not be heated because the resultant cell shrinkage may create a clear zone around the organism that is an artifact that can be mistaken for the capsule.
The capsule stain uses two reagents.
Primary Stain
Crystal Violet (1% aqueous) A violet stain is applied to a non–heat-fixed smear. At this point, the cell and the capsular material will take on the dark color.
Decolorizing Agent
Copper Sulfate (20%) Because the capsule is nonionic, unlike the bacterial cell, the primary stain adheres to the capsule but does not bind to it. In the capsule staining method, copper sulfate is used as a decolorizing agent rather than water.
The copper sulfate washes the purple primary stain out of the capsular material without removing the stain bound to the cell wall. At the same time, the decolorized capsule absorbs the copper sulfate, and the capsule will now appear blue in contrast to the deep purple color of the cell.
Figure 13.4 shows the presence of a capsule as a clear zone surrounding the darker-stained cell.
 |
| Figure 13.3 Spore-staining procedure |
 |
| Figure 13.4 Capsule stain |
CLINICAL APPLICATION
Encapsulated Bacterial Pneumonia
The virulence of an organism is increased by the presence of a capsule, since the capsule protects the organism from phagocytosis by white blood cells and inhibits antibody or complement fixation. The water-soluble polysaccharide and/or the polypeptide composition of the bacterial capsule makes staining this feature difficult. Gram-negative bacteria that form capsules include Haemophilus influenzae and Klebsiella pneumoniae. Gram-positive bacteria that form capsules include Bacillus anthracis and Streptococcus pneumoniae. If a bacterial infection is not being cleared or responding to antibiotic therapy as expected, staining of isolated organisms to determine the presence of a capsule may be warranted.
Materials
Cultures
48-hour-old skimmed milk cultures of Alcaligenes viscolactis, Leuconostoc mesenteroides, and Enterobacter aerogenes.
Reagents
1% crystal violet and 20% copper sulfate (CuSO4 ~ 5H2O).
Equipment
Bunsen burner, inoculating loop or needle, staining tray, bibulous paper, lens paper, glass slides, and microscope.
Procedure
Steps 1–5 are pictured in Figure 13.5.
1. Obtain one clean glass slide. Place several drops of crystal violet stain on the slide.
2. Using aseptic technique, add three loopfuls of a culture to the stain and gently mix with the inoculating loop.
3. With a clean glass slide, spread the mixture over the entire surface of the slide to create a very thin smear. Let stand for 5 to 7 minutes. Allow smears to air-dry. Note: Do not heat fix.
4. Wash smears with 20% copper sulfate solution.
5. Gently blot dry and examine under oil immersion.
6. Repeat Steps 1–5 for each of the remaining test cultures.
7. In the chart provided in the Lab Report, complete the following:
a. Draw a representative microscopic field of each preparation.
b. Record the comparative size of the capsule; that is, small, moderate, or large.
c. Indicate the color of the capsule and of the cell on each preparation.
 |
| Figure 13.5 Capsule staining procedure |

Use of Differential, Selective, and Enriched Media
LEARNING OBJECTIVES
Once you have completed this experiment, you should be familiar with
1. The use and function of specialized media for the selection and differentiation of microorganisms.
2. How an enriched medium like blood agar can also function as both a selective and differential medium.
Principle
Numerous special-purpose media are available for
functions including the following:
1. Isolation of bacterial types from a mixed population of organisms.
2. Differentiation among closely related groups of bacteria on the basis of macroscopic appearance of the colonies and biochemical reactions within the medium.
3. Enumeration of bacteria in sanitary microbiology, such as in water and sewage, and also in food and dairy products.
4. Assay of naturally occurring substances such as antibiotics, vitamins, and products of industrial fermentation.
5. Characterization and identification of bacteria by their abilities to produce chemical changes in different media.
In addition to nutrients necessary for the growth of all bacteria, special-purpose media contain both nutrients and chemical compounds important for specific metabolic pathways in different types of bacteria. In this exercise, three types of media will be studied and evaluated.
Selective Media
These media are used to select (isolate) specific groups of bacteria. They incorporate chemical substances that inhibit the growth of one type of bacteria while permitting growth of another, thus facilitating bacterial isolation.
1. Phenylethyl alcohol agar: This medium is used for the isolation of most gram-positive organisms. The phenylethyl alcohol is partially inhibitory to gram-negative organisms, which may form visible colonies whose size and number are much smaller than on other media.
2. Crystal violet agar: This medium is selective for most gram-negative microorganisms. Crystal violet dye exerts an inhibitory effect on most gram-positive organisms.
3. 7.5% sodium chloride agar: This medium is inhibitory to most organisms other than halophilic (salt-loving) microorganisms. It is most useful in the detection of members of the genus Staphylococcus.
Figure 15.1 is a photo illustrating the selective effect of phenylethyl alcohol agar, which inhibits the gram-negative organism E. coli and selects for the gram-positive organism S. aureus.
Differential/Selective Media
These media can distinguish among morphologically and biochemically related groups of organisms.
They incorporate chemical compounds that, following inoculation and incubation, produce a characteristic change in the appearance of bacterial growth and/or the medium surrounding the colonies, which permits differentiation.
Sometimes differential and selective characterisctics are combined in a single medium.
MacConkey agar is a good example of this because it contains bile salts and crystal violet, which inhibit gram-positive organisms and allow gramnegatives to grow. In addition, it contains the substrate lactose and the pH indicator neutral red, which differentiates the red lactose-fermenting colonies from the translucent nonfermenting colonies.
The following media are examples of this type of media:
1. Mannitol salt agar: This medium contains a high salt concentration, 7.5% NaCl, which is inhibitory to the growth of most, but not all, bacteria other than the staphylococci. The medium also performs a differential function:
It contains the carbohydrate mannitol, which some staphylococci are capable of fermenting, and phenol red, a pH indicator for detecting acid produced by mannitol-fermenting staphylococci.
These staphylococci exhibit a yellow zone surrounding their growth; staphylococci that do not ferment mannitol will not produce a change in coloration.
 | ||
| Figure 15.1 Selective effect of phenylethyl alcohol agar reduces the growth of | E. coli and selects for S. aureus |
2. MacConkey agar: The inhibitory action of crystal violet on the growth of Gram positive
organisms allows the isolation of gram-negative bacteria. Incorporation of the carbohydrate lactose, bile salts, and the pH indicator neutral red permits differentiation of enteric bacteria on the basis of their ability to ferment lactose. On this basis, enteric bacteria are separated into two groups:
a. Coliform bacilli produce acid as a result of lactose fermentation. The bacteria exhibit a red coloration on their surface.
Escherichia coli produce greater quantities of acid from lactose than other coliform species. When this occurs, the medium surrounding the growth also becomes pink because of the action of the acid that precipitates the bile salts, followed by absorption of the neutral red.
b. Dysentery, typhoid, and paratyphoid bacilli are not lactose fermenters and therefore do not produce acid. The colonies appear tan and frequently transparent.
3. Eosin–methylene blue agar (Levine):
Lactose and the dyes eosin and methylene blue permit differentiation between enteric lactose fermenters and nonfermenters as well as identification of the colon bacillus, E. coli.
The E. coli colonies are blue-black with a metallic green sheen caused by the large quantity of acid that is produced and that precipitates the dyes onto the growth’s surface. Other coliform bacteria, such as Enterobacter aerogenes, produce thick, mucoid, pink colonies on this medium. Enteric bacteria that do not ferment lactose produce colorless colonies, which, because of their transparency, appear to take on the purple color of the medium. This medium is also partially inhibitory to the growth of gram-positive organisms, and thus gram-negative growth is more abundant.
A photographic representation of the effects of selective/differential media is presented in Figure 15.2.
Enriched Media
Enriched media are media that have been supplemented with highly nutritious materials, such as blood, serum, or yeast extract, for the purpose of cultivating fastidious organisms.
For example, in blood agar, the blood incorporated into the medium is an enrichment ingredient for the cultivation of fastidious organisms such as the Streptococcus spp. The blood also permits demonstration of the hemolytic properties of some microorganisms, particularly the streptococci, whose hemolytic activities are classified as follows:
1. Gamma hemolysis: No lysis of red blood cells results in no significant change in the appearance of the medium surrounding the colonies.
2. Alpha hemolysis: Incomplete lysis of red blood cells, with reduction of hemoglobin to methemoglobin, results in a greenish halo around the bacterial growth.
3. Beta hemolysis: Lysis of red blood cells with complete destruction and use of hemoglobin by the organism results in a clear zone surrounding the colonies. This hemolysis is produced by two types of beta hemolysins, namely streptolysin O, an antigenic, oxygenlabile enzyme, and streptolysin S, a nonantigenic, oxygen-stable lysin. The hemolytic reaction is enhanced when blood agar plates are streaked and simultaneously stabbed to show subsurface hemolysis by streptolysin O in an environment with reduced oxygen tension. Based on the hemolytic patterns on blood agar, the pathogenic beta-hemolytic streptococci may be differentiated from other streptococci.
Figure 15.3 shows the different types of hemolysis exhibited by different species of the genus Streptococcus on blood agar.
 |
| Figure 15.2 Effects of selective/differential media |
 |
| Figure 15.3 Types of hemolysis exhibited on a blood agar plate |
CLINICAL APPLICATION
First Steps in Infected Wound Diagnosis
Wounds that have become infected may be swabbed or surgically processed to remove tissue.
Once stained samples have revealed infectious agents, cultures are typically made on (1) blood agar for isolation of staphylococci and streptrococci bacteria, (2) MacConkey agar for gram-negative rods, and (3) enriched media that can support aerobes or anaerobes, such as thioglycollate broth.
Additional media may be used, depending on what was observed microscopically, including Sabouraud dextrose agar for fungi and Löwenstein-Jensen medium for acid-fast rods. Once the microbes are isolated, further tests (which you will learn soon!) would likely be needed for complete identification.
Materials
Cultures
24- to 48-hour Trypticase soy broth cultures of Enterobacter aerogenes, Escherichia coli, Streptococcus var. Lancefield Group E, Streptococcus mitis, Enterococcus faecalis, Staphylococcus aureus, Staphylococcus epidermidis, and Salmonella typhimurium.
Media
Per designated student group: one each of phenylethyl alcohol agar, crystal violet agar, 7.5% sodium chloride agar, mannitol salt agar, MacConkey agar, eosin–methylene blue agar, and blood agar.
Equipment
Bunsen burner, inoculating loop, and glassware marking pencil.
Procedure Lab One
1. Using the bacterial organisms listed in Step 2, prepare and inoculate each of the plates in the following manner:
a. Appropriately label the cover of each plate as indicated in the Laboratory Protocol section on page xv.
b. Divide each of the Petri dishes into the required number of sections (one section for each different organism) by marking the bottom of the dish. Label each section with the name of the organism to be inoculated, as illustrated in Figure 15.4a.
c. Using aseptic technique, inoculate all plates, except the blood agar plate, with the designated organisms by making a single line of inoculation of each organism in its appropriate section (Figure 15.4b). Be sure to close the Petri dish and flame the inoculating needle between inoculations of the different organisms.
d. Using aseptic technique, inoculate the blood agar plate as described in Step 1c. Upon completion of each single line of inoculation, use the inoculating loop and make three or four stabs at a 45° angle across the streak.
2. Inoculate each of the different media with the following:
a. Phenylethyl alcohol agar: E. coli, S. aureus, and E. faecalis.
b. Crystal violet agar: E. coli, S. aureus, and E. faecalis.
c. 7.5% sodium chloride agar: S. aureus, S. epidermidis, and E. coli.
d. Mannitol salt agar: S. aureus, S. epidermidis, E. aerogenes, and E. coli.
e. MacConkey agar: E. coli, E. aerogenes, S. typhimurium, and S. aureus.
f. Eosin–methylene blue agar: E. coli, E. aerogenes, S. typhimurium, and S. aureus.
g. Blood agar: E. faecalis, S. mitis, and Streptococcus var. Lancefield Group E.
3. Incubate the phenylethyl alcohol agar plate in an inverted position for 48 to 72 hours at 37°C.
Incubate the remaining plates in an inverted position for 24 to 48 hours at 37°C.
 |
| Figure 15.4 Mannitol salt agar plate preparation and inoculation procedure |
Procedure Lab Two
1. Carefully examine each of the plates. In the chart provided in the Lab Report, note and record the following:
a. Amount of growth along line of inoculation as follows: 0 = none; 1+ = scant; and 2+ = moderate to abundant.
b. Appearance of the growth: coloration, transparency.
c. Change in the appearance of the medium surrounding the growth: coloration, transparency indicative of hemolysis.

Techniques for the Cultivation of Anaerobic Microorganisms
LEARNING OBJECTIVES
Once you have completed this experiment, you should be familiar with
1. The methods for cultivation of anaerobic organisms.
Principle
Microorganisms differ in their abilities to use oxygen for cellular respiration. Respiration involves the oxidation of substrates for energy necessary to life. A substrate is oxidized when it loses a hydrogen ion and its electron (H+e−). Since the H+e− cannot remain free in the cell, it must immediately be picked up by an electron acceptor, which becomes reduced. Therefore reduction means gaining the H+e−. These are termed oxidation-reduction (redox) reactions. Some microorganisms have enzyme systems in which oxygen can serve as an electron acceptor, thereby being reduced to water. These cells have high oxidation-reduction potentials; others have low potentials and must use other substances as electron acceptors.
The enzymatic differences in microorganisms are explained more fully in the section dealing with metabolism (see Part 5). This discussion is limited to cultivation of the strict anaerobes, which cannot be cultivated in the presence of atmospheric oxygen (Figure 19.1). The procedure is somewhat more difficult because it involves sophisticated equipment and media enriched with substances that lower the redox potential. Figure 19.2 shows some of the methods available for anaerobic cultivation.
The following experiment uses fluid thioglycollate medium and the GasPak TM anaerobic system.
 | ||
| Figure 19.1 Illustration of redox potentials in an | agar deep tube |
CLINICAL APPLICATION
Oxygen as a Treatment?
The causative agent of gas gangrene, Clostridium perfringens, is an anaerobic bacterium that thrives in wounds deprived of circulation and oxygen and can cause limb loss and death. Treatment may involve amputation or surgical removal of infected tissue. Doctors may also prescribe therapy using enriched oxygen delivered to the patient in a hyperbaric chamber. This allows the blood to carry more oxygen to the wounds, slowing the growth of anaerobic microbes. Patients typically undergo five 90-minute sessions lying in a chamber pressurized to 2.5 atmospheres, possibly alleviating the need for surgery.


Tidak ada komentar:
Posting Komentar